The default active cell format in Microsoft Excel isn’t all that easy to see, but you can use this easy-to-implement code solution to change that.

Image: PixieMe/Shutterstock
By default, the active cell in Excel is noted by a green border. There’s no highlight or shading. Even if you change themes and colors, the active cell remains the same. As is, it’s notable and probably easy to find for most of us, but that doesn’t mean you can’t change it. As far as I know, there’s no built-in theme or style that lets you control the active cell. Fortunately, you can do so with VBA. In this article, I’ll show you a VBA procedure that changes the format properties for the active cell.
SEE: 83 Excel tips every user should master (TechRepublic)
I’m using Microsoft 365 on a Windows 10 64-bit system, but you can use earlier versions. However, Excel Online doesn’t support VBA. You can work with your own file or download the demonstration .xlsm, .xls and .cls files for easy access to the code.
This is not my original code; this procedure and others like it have been available online for years. If I knew who to credit, I would.
More about Excel’s active cell
When you select a cell, Excel displays a green border around that cell, the active cell. When you move to another cell or range, Excel removes the green border from the previous active cell and applies it to the current active cell. If you select a range, Excel applies that green border to the entire range. The active cell in that range is still white (or clear), but Excel applies a gray shade to the remaining cells, as shown in Figure A. If this isn’t adequate for you or your users, you can use a VBA procedure to change the way Excel visually denotes the active cell.
Figure A
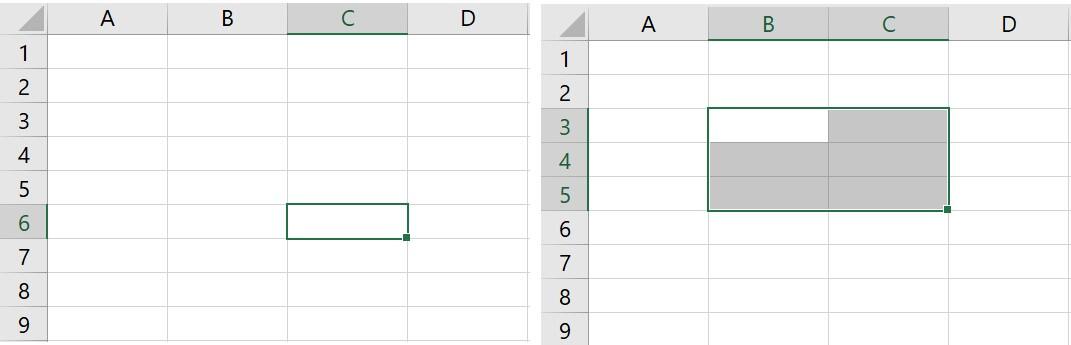
Look for the green border to find the active cell.
About the VBA procedure
Whatever your reason, you can easily change the fill color for the active cell using VBA’s Worksheet_SheetSelectionChange event. This event is triggered when the selection changes on any worksheet—in short, when you change the active cell. (It doesn’t work on a chart sheet.) What you can’t do, to my knowledge is change the border color. The Range object (Target in the procedure) does have a Border property, but it doesn’t play well with the internal active cell border property. You will see the new border color for only a brief moment between selections. The procedure in the demo files has statements that are commented out; you can see how working with the border works by removing the comment character (‘) at the beginning of these statements.
The procedure in Listing A uses a static variable, rngOld to track the current and the previous active cells. The current active cell becomes the previous when you select a different cell.
Listing A
Private Sub Workbook_SheetSelectionChange( _
ByVal Sh As Object, ByVal Target As Excel.Range)
‘Change the formatting properties for the active cell.
Static rngOld As Range
On Error Resume Next
‘Color of active cell, passed as Target.
Target.Interior.ColorIndex = 8 ‘Cyan
‘Resets previous active cell to no color.
rngOld.Interior.ColorIndex = xlColorIndexNone
‘Sets static range to Target, the new active cell.
‘Next selection, rngOld will be the previous
‘active cell.
Set rngOld = Target
End Sub
It’s important to note that rngOld is a static variable. That means it retains its value even after the procedure is done. Other variables lose their value when the procedure ends. Target is passed to the procedure as the current active cell. That cell’s fill color is set to Cyan (a neon blue). rngOld, which is the previous active cell is set to nothing—in effect, removing the temporary format. Finally, rngOld is set to Target. As a static variable, when you change the active cell, rngOld will equal the previous active cell. I know it’s a bit confusing but stepping through the code using a breakpoint and F8 might clear things up for you, if you know how. Split your screen and watch the cells update as you step through the code.
Running the VBA procedure
To enter the procedure, press Alt + F11 to open the Visual Basic Editor (VBE). In the Project Explorer to the left, select ThisWorkbook so you can run the procedure in any sheet. You can enter the code manually or import the downloadable .cls file. In addition, the macro is in the downloadable .xlsm, .xls and .cls files. If you enter the code manually, don’t paste from this web page. Instead, copy the code into a text editor and then paste that code into the ThisWorkbook module. Doing so will remove any phantom web characters that might otherwise cause errors.
SEE: Windows 10: Lists of vocal commands for speech recognition and dictation (free PDF) (TechRepublic)
If you are using a ribbon version, be sure to save the workbook as a macro-enabled file. If you’re working in the menu version, you can skip this step.
Return to Excel and start clicking cells. Each time you change the selection, you trigger the procedure, which changes the fill color of the active cell, temporarily. Figure B shows this with a single cell and a range.
Figure B
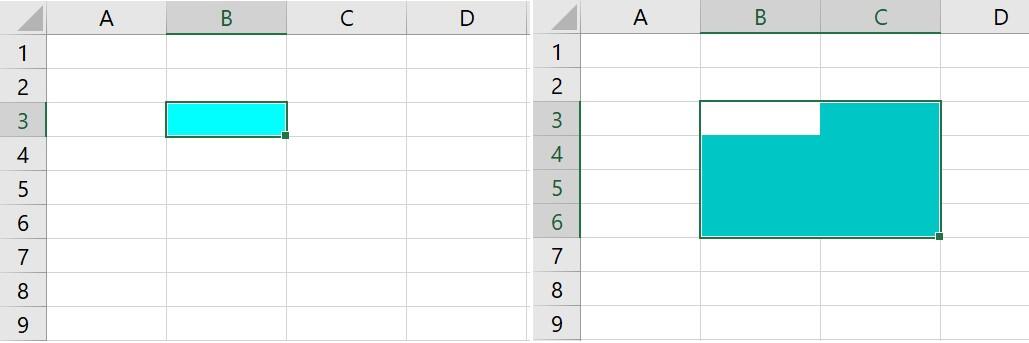
Use this procedure to change the fill color of the active cell.

Microsoft Weekly Newsletter
Be your company’s Microsoft insider by reading these Windows and Office tips, tricks, and cheat sheets.
Delivered Mondays and Wednesdays
Also see
Stay connected with us on social media platform for instant update click here to join our Twitter, & Facebook
We are now on Telegram. Click here to join our channel (@TechiUpdate) and stay updated with the latest Technology headlines.
For all the latest Technology News Click Here
For the latest news and updates, follow us on Google News.
Denial of responsibility! NewsAzi is an automatic aggregator around the global media. All the content are available free on Internet. We have just arranged it in one platform for educational purpose only. In each content, the hyperlink to the primary source is specified. All trademarks belong to their rightful owners, all materials to their authors. If you are the owner of the content and do not want us to publish your materials on our website, please contact us by email – [email protected]. The content will be deleted within 24 hours.