If you think that overclocking is solely for performance-obsessed geeks armed with bottles of liquid nitrogen, it’s time to reconsider! Even a small bump in PC performance can delay the need to upgrade your processor, keeping money in your pocket. Yes, overclocking can make the best gaming CPUs even better.
Today I’ll walk you through simple overclocking steps that can usually boost processor speeds 10 percent or more. If you’re a gamer, video artist, or media streamer, that’s a useful, no-cost upgrade. Read on if you want your PC to go faster!
What is overclocking, anyway?
Overclocking is a technique for tweaking various types of PC hardware, so that it runs faster than the manufacturer’s intended specification. Many processors, RAM modules, and graphics cards can be overclocked, usually by adjusting their settings via your motherboard’s UEFI BIOS. Operate in safe margins and overclocking shouldn’t damage your PC. But, as we’ll discuss, it’s important to manage the additional heat that accelerated hardware can generate.
Some tips for the journey
There are a few guiding principles worth considering before you overclock a CPU. First, not all processors can be easily overclocked. If you’re Team AMD, you’re probably in luck, as all modern Ryzen processors can be overclocked in B- and X-series AM4 motherboards. Intel, however, locks most of its mainstream CPUs to prevent smart users from purchasing a budget component and jacking up its performance. Pricier enthusiast processor lines (identified by a K or X suffix, such as the Intel Core i9-11900K), on the other hand, are sold unlocked and can therefore be overclocked.
Even then, bear in mind that processors are unique slabs of silicon and electronics. Some processors can tolerate higher operating speeds better than others—even those of the same model and specification. It’s known as the “silicon lottery” for a reason!
Stable overclocks entail a delicate balance of speed and heat. The more you push your processor, the hotter it’s going to get. If your PC becomes a little too toasty, integrated fail-safe measures should shut off the power before those expensive components are damaged. To keep your overclocked PC stable, your job is to keep it cool.
Budget CPU coolers (the stock heatsink-and-fan assembly that ships with many processors) are going to struggle here. Consider upgrading to a better-performing air cooler (such as those from Noctua) or investigate all-in-one liquid coolers, which work much like a car’s radiator. I recently upgraded my gaming rig with the NZXT Kraken X62 which pumps coolant over the CPU via a sealed system, then extracts the heat via a large radiator and double-fan assembly, mounted in the top of the case.
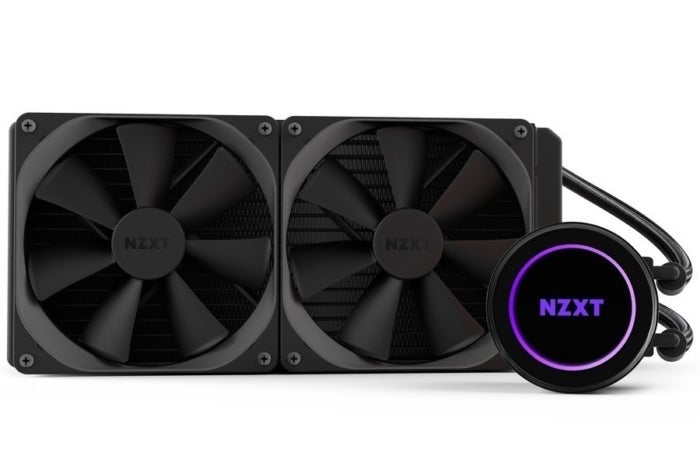 NZXT
NZXTNZXT Kraken X62
We’re about to get hands-on with a motherboard’s UEFI BIOS software, which allows fine-tuning of your hardware settings. However, some motherboard manufacturers offer convenient apps that attempt to safely overclock your CPU for you. If these manual steps seem a little tough, then check out the likes of Asus Dual Intelligent Processors 5, Gigabyte EasyTune, AMD’s Ryzen Master, or Intel’s Extreme Tuning Utility. MSI motherboards even have a physical OC Genie button you can press to turbocharge your PC.
Overclocking basics
For this guide, I’m using an Asus Maximus VIII Hero Alpha motherboard with an Intel Core i7-6700K processor. Obviously, these steps may need to be tweaked for your particular hardware, but the principles still apply.
Before you get started, be sure to download and install the latest BIOS software for your motherboard from the manufacturer’s website. It’s an important step to ensure you have the latest configuration options and that your efforts aren’t frustrated by known issues.
Let’s boot up the PC, press F2 (or Delete) at startup to access the BIOS, and get started.
As you can see below, this processor runs at a base frequency of 4GHz (4,000MHz). It’s also equipped with a Max Turbo feature that boosts speeds to 4.2GHz when required. When idle, the CPU temperature is a cool 25 degrees C, with a core voltage of 1.264V—the amount of power that’s being supplied to the CPU.
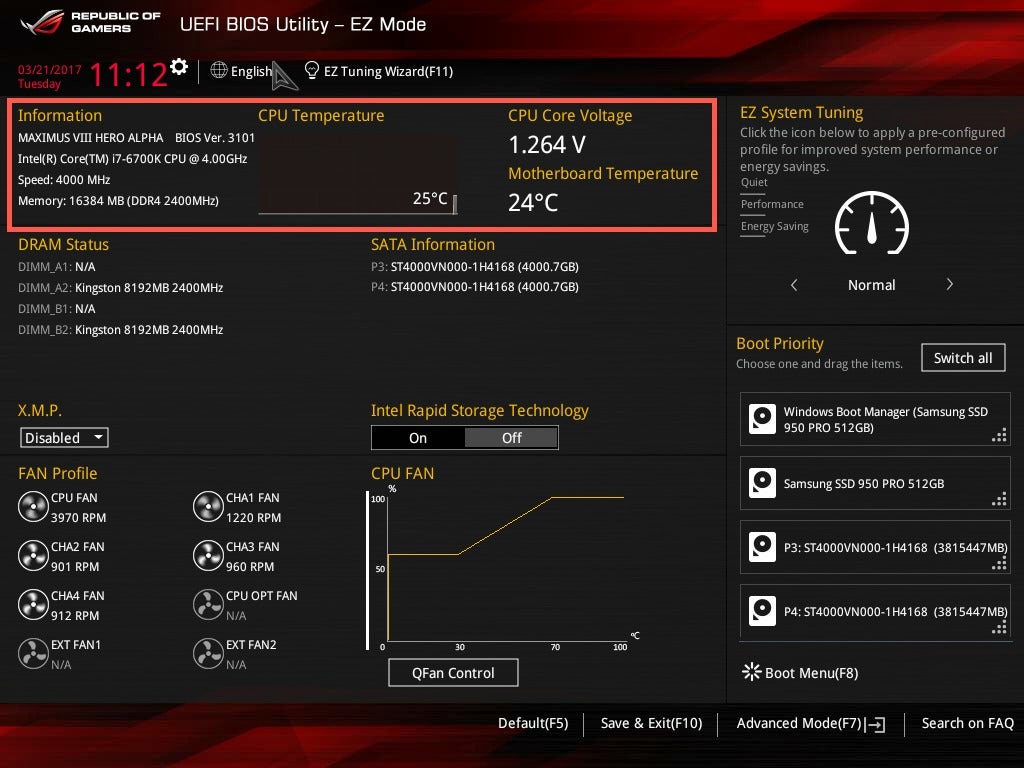 Terry Walsh/IDG
Click F7 to switch to Advanced Mode, which is where we’ll be spending most of our time in this guide (see below). On the right of the screen, there are two additional settings to mention: BCLK is the base clock frequency, currently set to 100MHz. Underneath that, you’ll see a Ratio setting (often known as the multiplier). Your processor speed is a simple calculation of the base clock speed multiplied by the ratio. In this example, 100MHz x 40 equals 4,000MHz (4GHz).
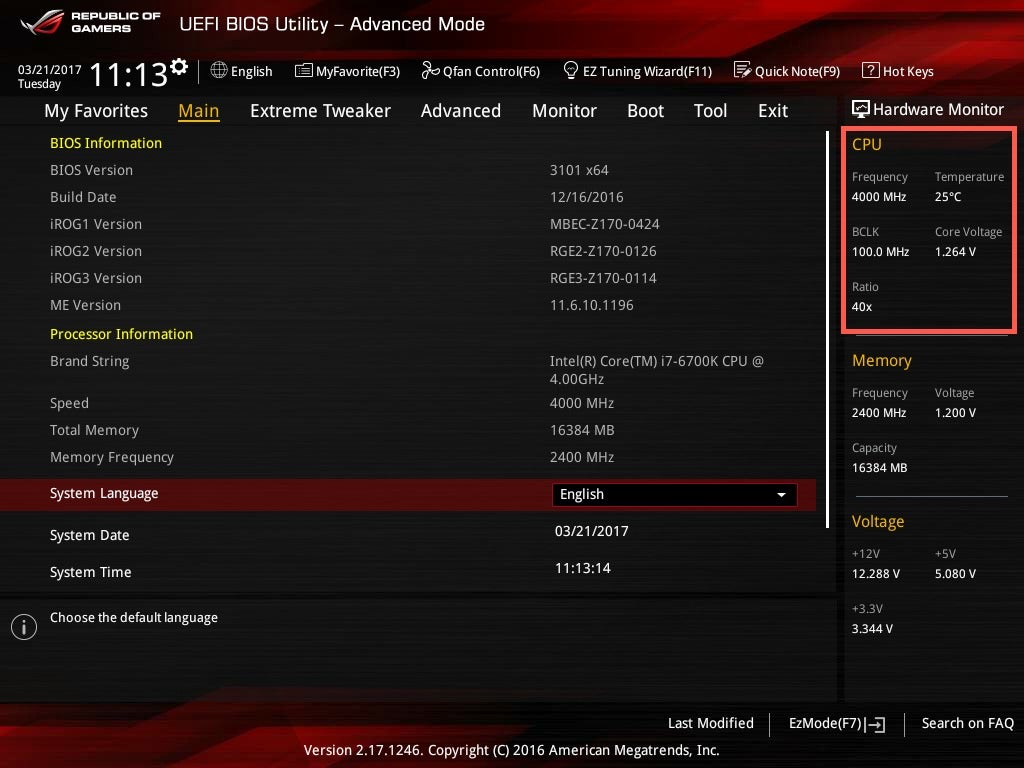 Terry Walsh/IDG
To overclock the CPU, we can adjust the base clock frequency or the ratio/multiplier to achieve a faster CPU frequency. A ratio of 42x with the same 100MHz base clock speed would deliver a CPU frequency of 4,200MHz, or 4.2GHz.
Switching to manual control
Modern motherboards can be equipped with a raft of automated settings designed to make overclocking easy.
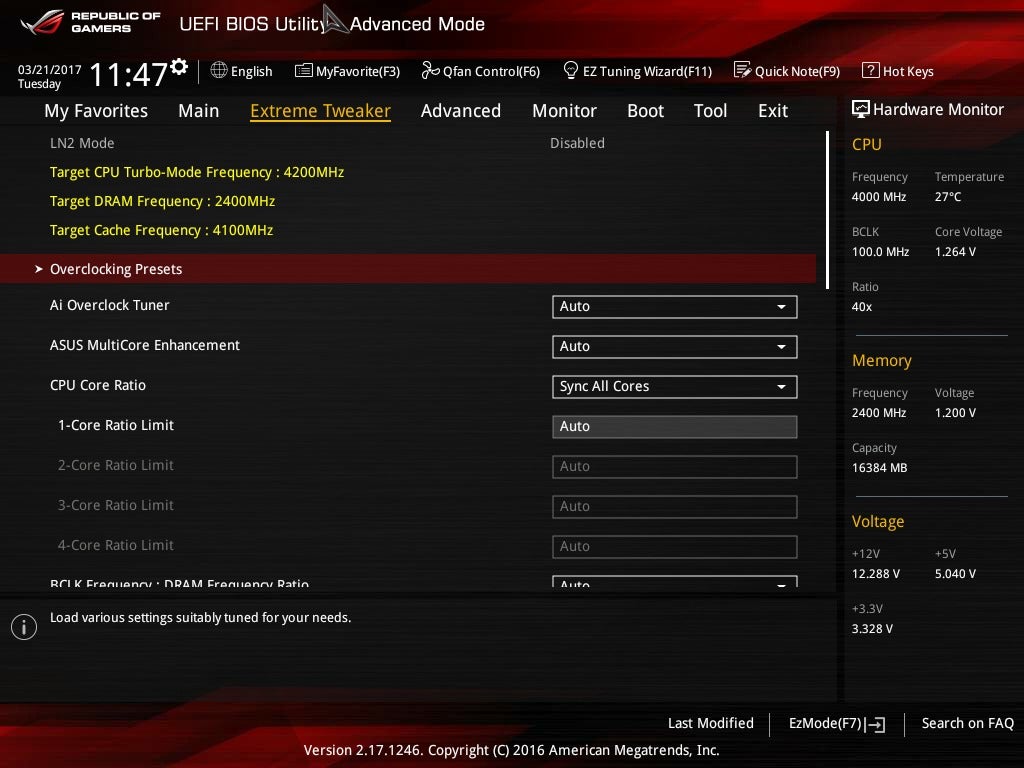 Terry Walsh/IDG
In the Asus Extreme Tweaker menu, we switch the Ai Overclock Tuner from Auto to Manual, which allows access to the base clock frequency setting. You can now type a value into the BCLK Frequency field. Hold fire for now, though.
Below, you’ll see CPU Core Ratio, which allows us to adjust the multiplier. Some motherboards allow you to target individual processor cores or apply one setting across all cores. Why? Applying the same ambitious overclocking profile to all processor cores may make your PC unstable. But, dial back the settings on individual cores and you may achieve a better balance.
 Terry Walsh/IDG
With the CPU Core Ratio set to anything other than Auto, the Core Ratio Limit settings become editable. Sync All Cores enables the 1-Core Ratio Limit setting. Any value you type here is applied across all four cores. Select Per Core and you can target each core individually.
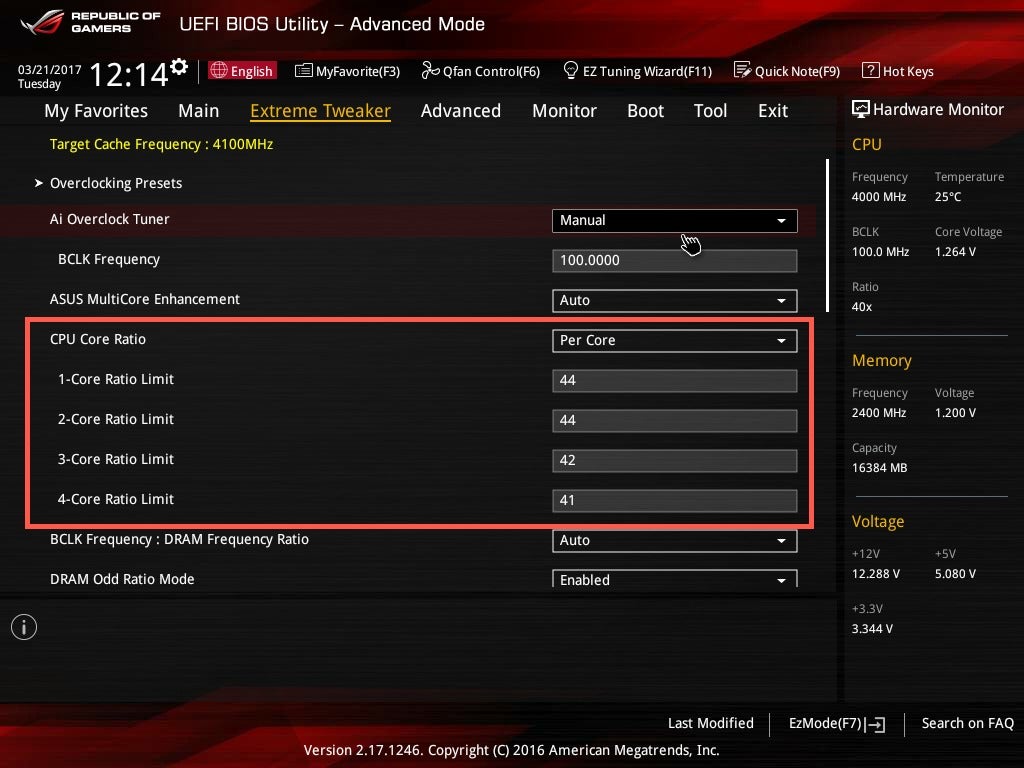 Terry Walsh/IDG
We’ll synchronize speeds across all cores in this guide, but feel free to play with individual core settings if required.
Before we make any changes to the base clock frequency or CPU ratios, there’s an additional element to consider: voltage. The voltage applied to your CPU varies continually. Faster operating speeds require additional power for stability. Your motherboard handles this behind the scenes but, should you wish, you can set manual voltage levels to support your overclocking efforts.
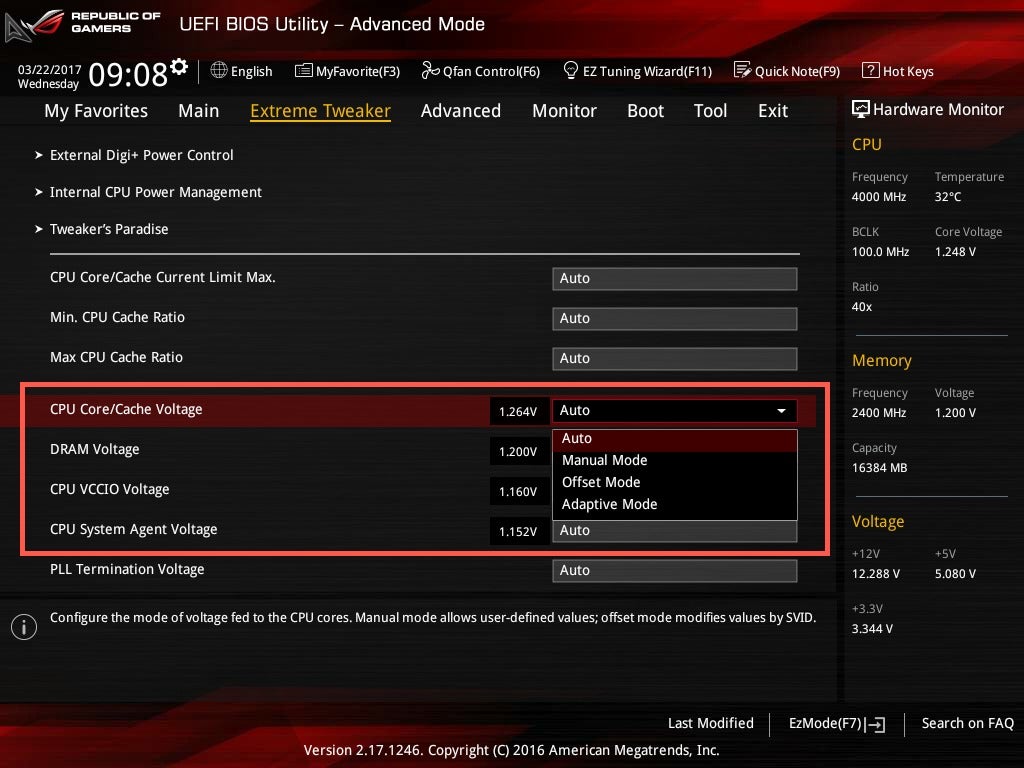 Terry Walsh/IDG
Scroll down to CPU Core/Cache Voltage and click the drop-down menu. You can see three alternative settings. Manual Mode sets a single, static voltage level. Whether your CPU is idle or running at full tilt, the same voltage will be applied. Thinking about power consumption, Manual Mode is quite inefficient, but gives you the most control.
Offset Mode works by adding (or subtracting, if you wished to underclock) a set amount of power to the standard voltage that the processor would use. The voltage would still vary based on requirements, but the range would be boosted by whatever step you configured. So, if you created an offset of 0.1 V, for example, and the processor typically requires 1.25 V to deliver a certain speed, 1.35 V would actually be supplied.
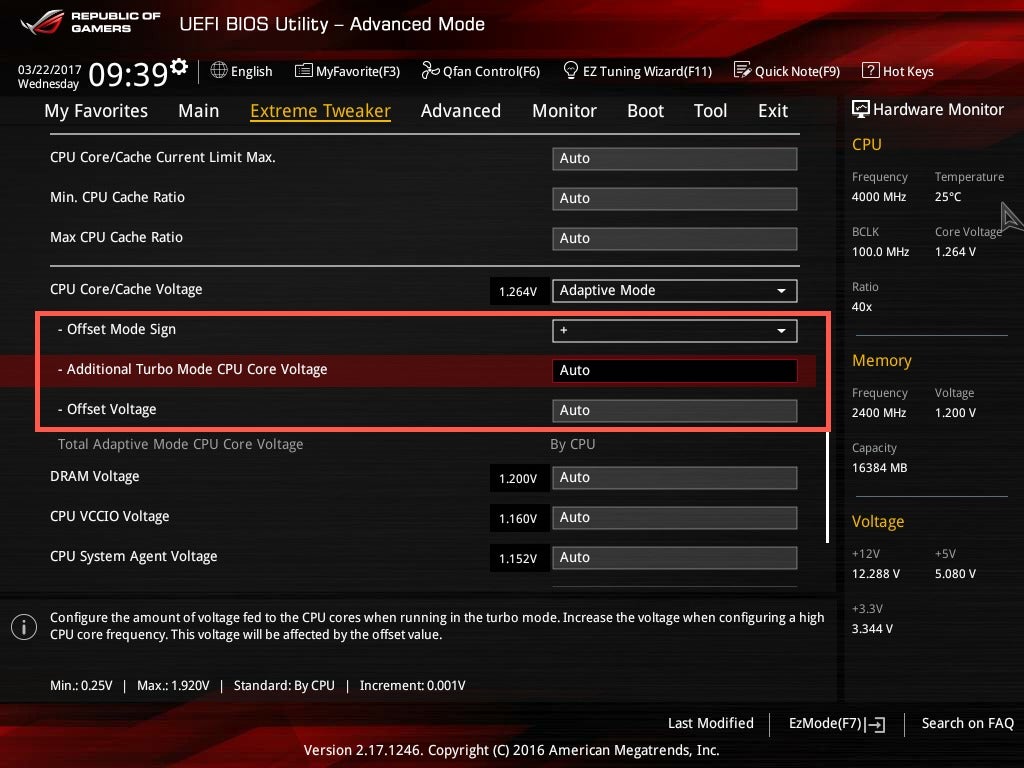
In Adaptive Mode, your CPU would only receive a voltage boost when it enters turbo mode. It’s worth noting that, on some motherboards, you can also include an Offset value for Adaptive Mode, that also provides a voltage boost to the processor outside of turbo mode.
 Terry Walsh/IDG
If you’re taking your first steps in overclocking, allow your motherboard to handle voltage automatically—at least until you’ve built up some experience. If you experience instability, then experiment with Adaptive and Offset modes to support your CPU with a small voltage boost. Benchmarking PCs in manual voltage modes can place significant stress on the CPU, increasing their risk of failure.
Be sure to also pay attention to any contextual help provided in your UEFI BIOS, or motherboard manual. In the screenshot above, you can see guidelines at the bottom of the screen outlining minimum and maximum voltage settings, as well as the increment to use.
Benchmark, then boost
Now that we’ve discussed the basic principles of overclocking, I’m sure you’re wondering what settings to try for your own PC! As every processor is unique, there are no standard overclock settings that are guaranteed to work on every PC. It’s time to experiment!
Let’s recap on the goal. We want to attain the fastest processor speed on a PC that remains cool(ish) and stable. By stable, I mean that it POSTs (completes the Power On Self Test), it boots into an operating system, and then successfully completes a benchmark stress test.
My advice here is simple. Benchmark, then boost. Then benchmark again, then boost. And so on. Benchmark your PC in a non-overclocked state, to understand your baseline voltage, temperatures, and clock speeds. Then, increase the base clock frequency and/or multiplier to target a small boost (say, 0.2GHz). Reboot the PC and run your benchmark again to see if it’s stable. If it is, repeat the boost and benchmark. If not, dial back the target settings a little (or boost voltage) and try again.
Overclocking can be a laborious process, but this safe, incremental approach helps you gain a good understanding of your processor’s capabilities.
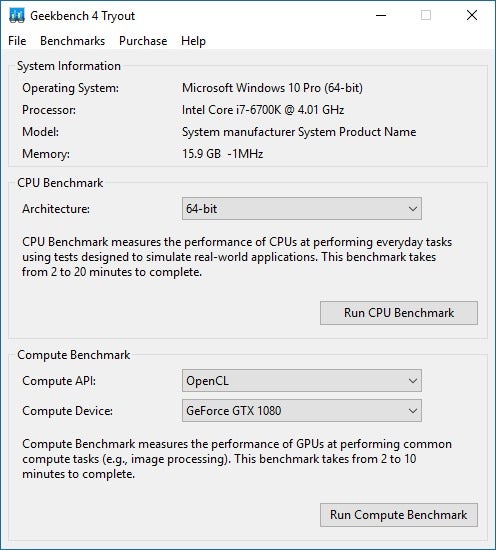
There are a variety of applications you can use to benchmark your CPU. Geekbench is a popular choice, as is PCMark and Cinebench. Most of these are commercial applications, but offer a free trial. (Our guide to the best benchmarking software for your PC can walk you through solid testing apps for every major component if you want to take things beyond the CPU.)
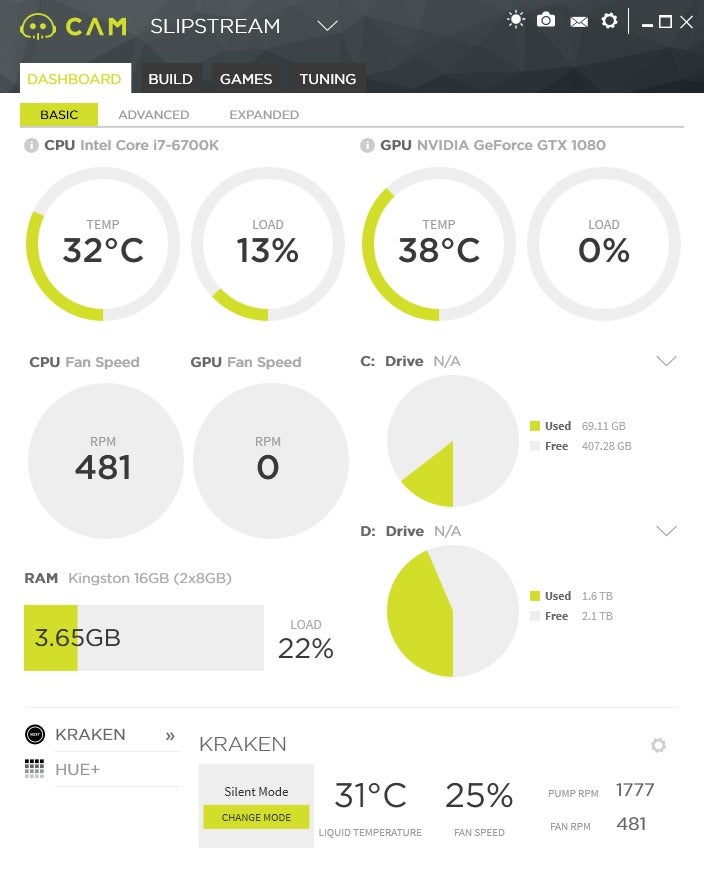
I’ll use Geekbench 4 today, alongside a great monitoring app, CPU-Z, which provides all the detail I need on voltages and speeds. For temperature monitoring, I use NZXT’s CAM application but you may prefer an alternative such as SpeedFan or another app bundled with your motherboard. There are several great options, all covered in our explainer on how to check your CPU temperature.
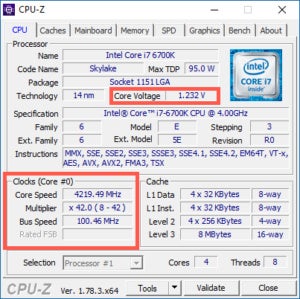
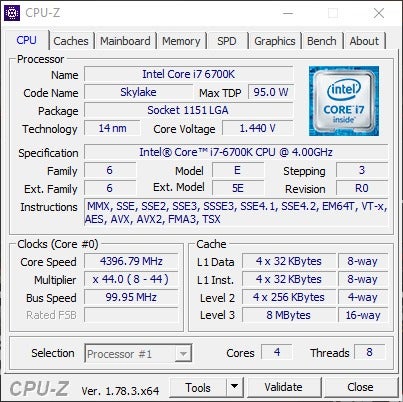
Here’s a snapshot from CPU-Z before overclocking the processor. The figures look static in the screenshot, but continually update depending on processor load.
 Terry Walsh/IDG
Pay attention to Core Voltage and Clocks section. The latter displays your overall CPU speed and multiplier. In terms of CPU temperature, at idle, my processor is running at a reasonably cool 32 degrees C.
 Terry Walsh/IDG
Open Geekbench 4 (or whichever app you choose) and run your baseline CPU benchmark.
 Terry Walsh/IDG
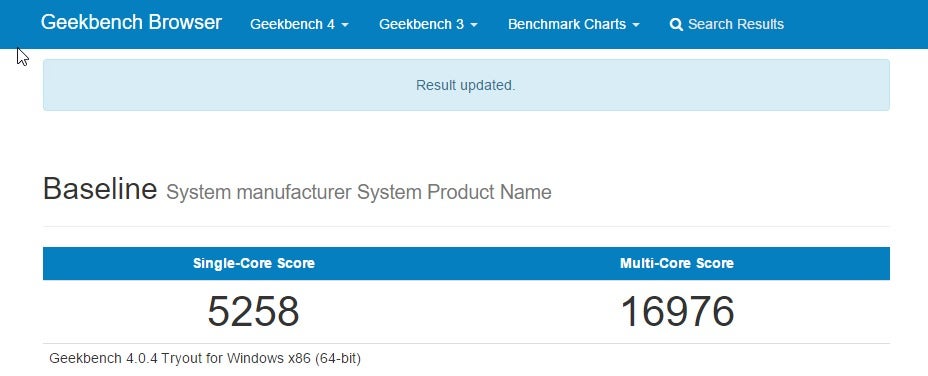
For accurate results, leave the PC alone while the benchmark runs, but keep an eye on the CPU-Z window and temperature monitor to see how speeds, voltage, and temperatures change under load. Once the benchmark completes, results can be viewed in your web browser. Geekbench provides both a single-core and multi-core score, which you should note for comparison with subsequent tests. I noticed a peak CPU temperature of 54 C during the test.
 Terry Walsh/IDG
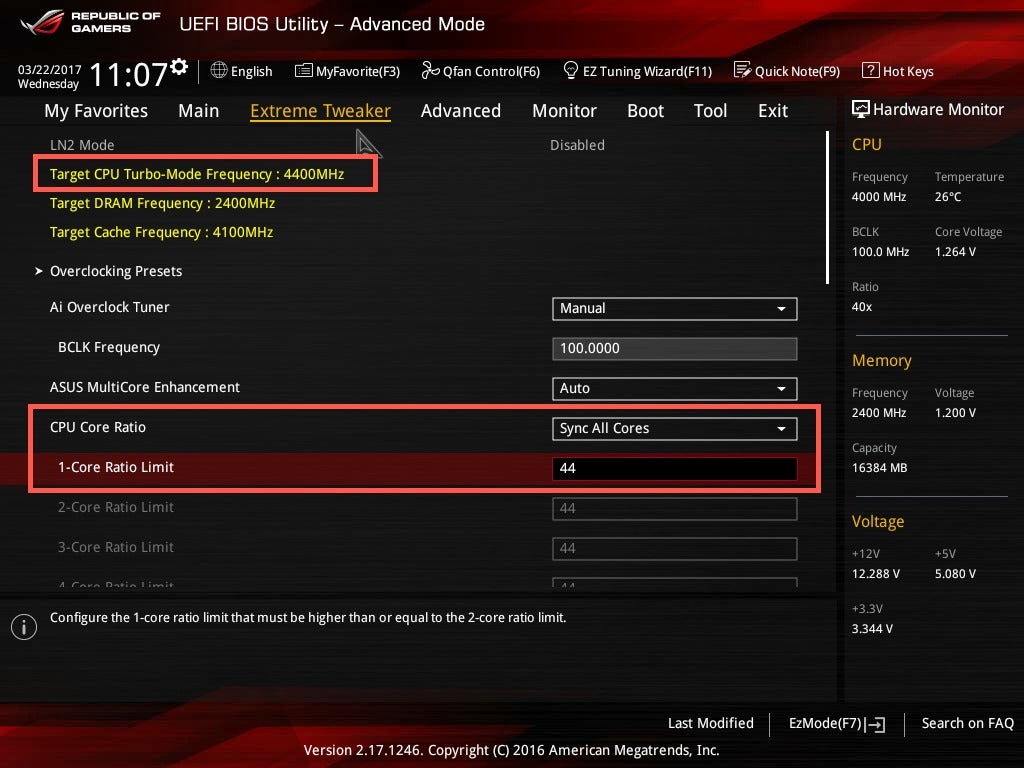
Reboot the PC and enter the UEFI BIOS once again. As we know the CPU can handle 4.2GHz (the default turbo mode speed), for my first overclocking attempt, I’ll adjust the Core Ratio Limit to 44, which targets a maximum speed of 4.4GHz. I haven’t manually adjusted the voltage at this point, but can do so if these settings are unstable.
 Terry Walsh/IDG
Reboot the PC and open CPU-Z once again to check core speeds and voltage. With the new settings in place, we can validate a core speed of 4.4GHz and voltage of 1.44 V.
 Terry Walsh/IDG
Repeat the benchmark test to see if the PC remains stable with the CPU under load. This time, I noticed CPU temperatures spiking at 71 C with noticeably more fan noise generated by the CPU cooler’s pump and fans. However, the PC remained stable.
CPU temperatures in the low- to mid-70s are about as high as you want to go for safe overclocking. Experience sustained temperatures in the 80s and you’ll certainly be taking some risks with your hardware. But, in the spirit of adventure, I pressed on, incrementing target speeds by just 0.1GHz with each run.
Faster doesn’t always lead to better performance
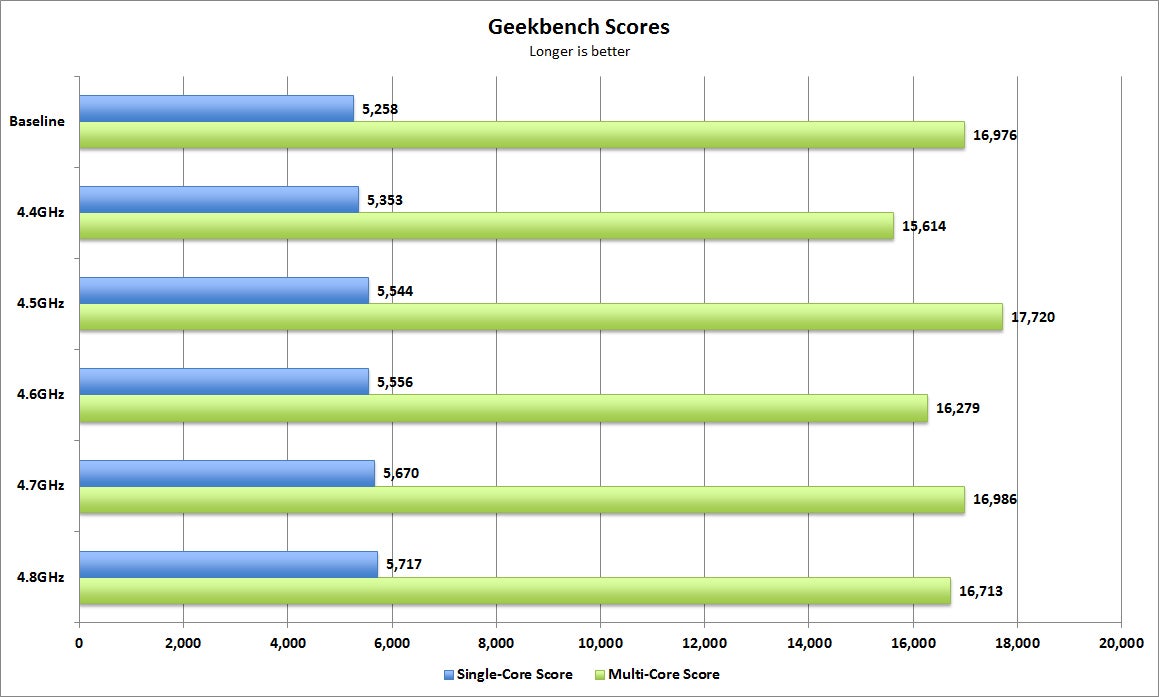
I achieved an overclock of 4.8GHz before my PC became unstable. At 4.9GHz, it simply locked up when booting into Windows. At this speed, the peak temperature of the hottest core under load hit 87 C, which is a little uncomfortable. I’d be tempted to dial back for safety, but the results show what’s possible—at least for this processor.
One final tip: Faster processor speeds won’t always lead to better performance. The additional heat generated by overclocking can sometimes cause your processor to throttle down, reducing performance. Look at my benchmark results to see the proof:
 IDG
IDG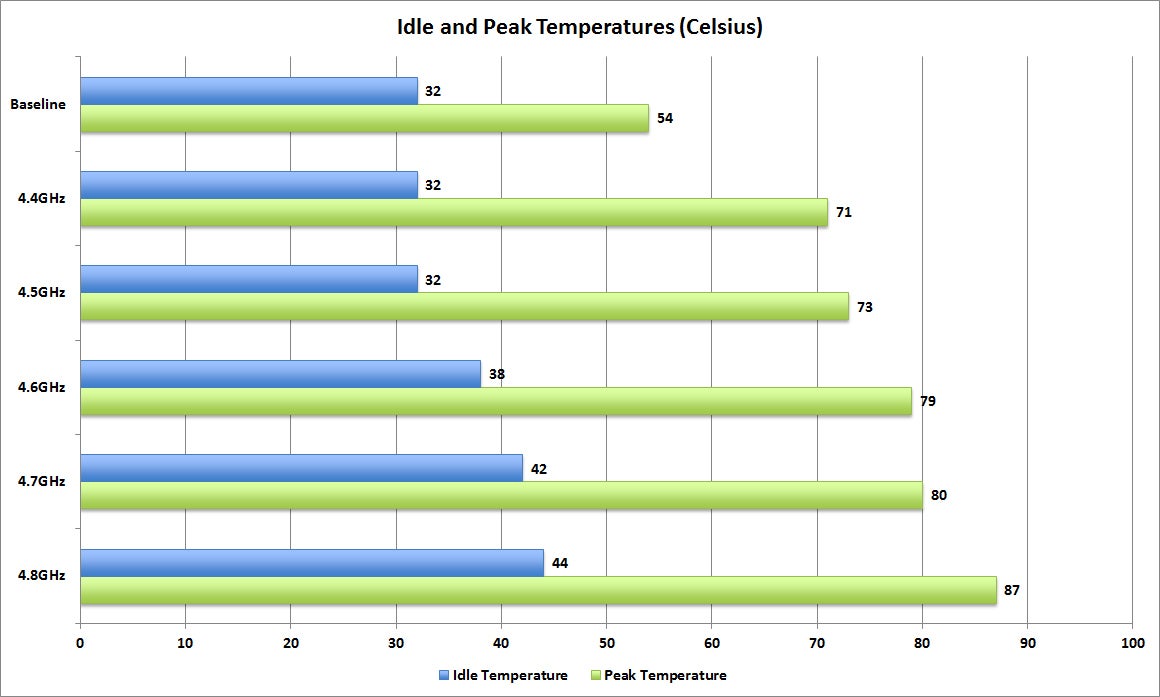 IDG
IDGYou can see there’s a steady improvement in the single-core benchmark score as I increased the maximum CPU speed. However, the multi-core benchmark score is more erratic, peaking at 4.5GHz and then decaying as target speed (and peak temperatures) increase. There’s a sweet spot to be found—the best balance of speed, heat, and performance. Its another great reason to test CPU performance in small increments. Benchmark, then boost.
Remember, your results may well be different than mine, courtesy of that silicon lottery. But armed with a grip on the basics, take your time to tweak your own CPU settings and find its sweet spot. A 10 or 15 percent speed boost is yours for the taking, at no additional cost.
Note: When you purchase something after clicking links in our articles, we may earn a small commission. Read our affiliate link policy for more details.
Stay connected with us on social media platform for instant update click here to join our Twitter, & Facebook
We are now on Telegram. Click here to join our channel (@TechiUpdate) and stay updated with the latest Technology headlines.
For all the latest Technology News Click Here
For the latest news and updates, follow us on Google News.
Denial of responsibility! NewsAzi is an automatic aggregator around the global media. All the content are available free on Internet. We have just arranged it in one platform for educational purpose only. In each content, the hyperlink to the primary source is specified. All trademarks belong to their rightful owners, all materials to their authors. If you are the owner of the content and do not want us to publish your materials on our website, please contact us by email – [email protected]. The content will be deleted within 24 hours.