How do you test Windows 11 for compatibility with essential apps without putting your work at risk? Simple: Use the built-in Hyper-V platform on your Windows 10 PC to create a virtual machine and install Windows 11. You can run your existing apps and services in that virtual machine without risking the integrity or stability of your “real” PC.
Creating a new virtual PC is easy, assuming your PC satisfies the requirements. You must be running a 64-bit business edition of Windows Pro or Enterprise edition; the Home edition does not include Hyper-V support. In addition, your CPU and associated hardware must meet specific requirements. Most modern CPUs pass this test with ease. (For full details, see “Windows 10 tip: Find out if your PC can run Hyper-V.”)
You also need enough physical hardware resources to devote to your virtual machine. I recommend at least 8 GB of memory, along with enough unused local storage to hold a full installation of Windows, apps, and checkpoints (32 GB should be sufficient).
Finally, you need a copy of the Windows 11 installation files in ISO format. You can get that file from Microsoft’s Download Windows 11 page; choose the Download Windows 11 Disk Image (ISO) option.
With those preliminaries out of the way, you’re ready to get started. Note that all of the steps below work exactly the same on Windows 10 and Windows 11.
1. Click Start and type Hyper-V in the search box. If Hyper-V is already enabled, open the Hyper-V Manager utility and skip to the next step. If you see the Turn Windows features on or off option, click to open the Windows Features dialog box, choose the Hyper-V option, and restart your PC to continue.
2. In Hyper-V Manager, make sure your PC’s name is selected in the center pane and then, in the Actions pane on the right, click New > Virtual Machine.
3. In the New Virtual Machine wizard, use the following settings:
- Specify Name and Location – Enter a descriptive name here. This name will appear in the Hyper-V Manager window.
- Specify Generation – Choose Generation 2 here. (You won’t be able to install Windows 11 on a Generation 1 VM, which is strictly for legacy operating systems.)
- Assign Memory – You can use the default settings here. If you have at least 16 GB of RAM on the host PC, I recommend entering 4096 MB in the Startup Memory box.
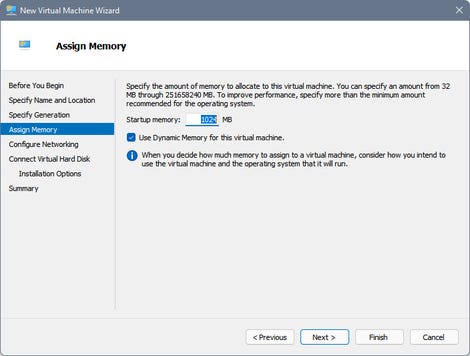
The default Dynamic Memory option keeps RAM usage to a minimum, expanding as needed
- Configure Networking – Choose Default Switch from the drop-down menu.
- Connect Virtual Hard Disk – Use the default option, Create A Virtual Hard Disk. You can safely leave its size at 127 GB. Hyper-V creates a dynamically expanding virtual hard disk that uses only a fraction of that space.
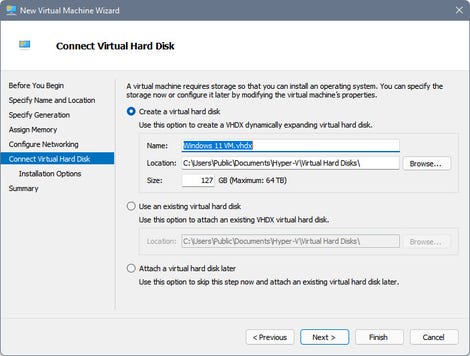
These default settings create a dynamically expanding 127 GB virtual hard disk that uses only a small amount of actual disk space
- Installation Options – Choose the second option, as shown here; then click Browse and choose the Windows 11 ISO from your Downloads folder.
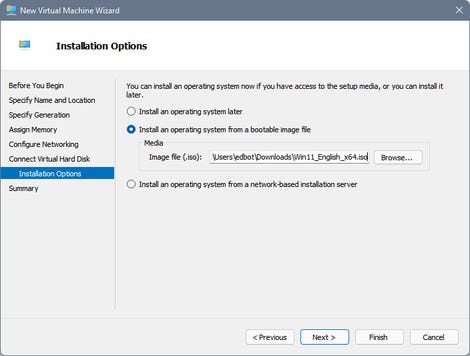
Specify the location of the Windows 11 installation file to automatically mount your ISO as a virtual DVD drive
4. Click Finish to create the virtual machine, but don’t connect to the VM just yet. Instead, from Hyper-V Manager, right-click the VM you just created, click Settings, and make the following tweaks to avoid having Windows 11 complain later that your VM doesn’t meet its hardware requirements:
- In the Hardware pane on the left, select Security. Then, in the pane on the right, click Enable Trusted Platform Module.
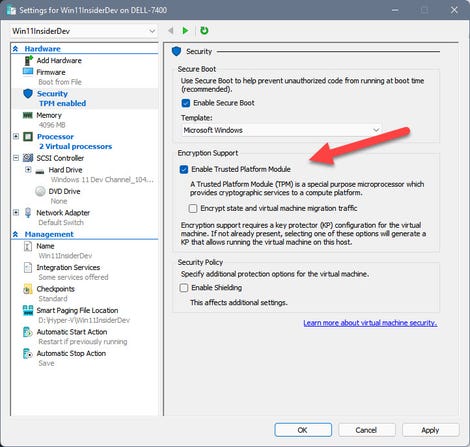
Select this checkbox to enable the virtual TPM required for a Windows 11 VM.
- Select Processor in the Hardware pane and change the setting for Number Of Virtual Processors to 2.
- Click OK to save your changes.
5. Double-click the VM and click Start to connect to the virtual machine. Be prepared to click in the Virtual Machine Connection and tap any key to boot from the virtual DVD you created using your Windows 11 ISO. That should open the Windows Setup screen shown here.
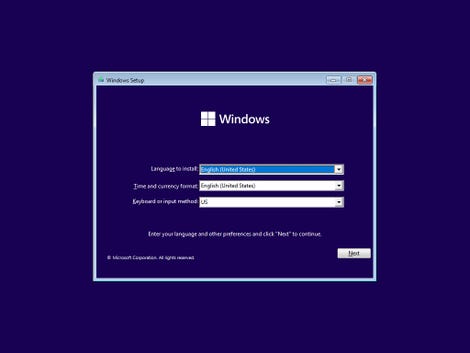
If everything’s configured correctly, you can start here to do a clean install of Windows 11 on your new VM
6. Follow the prompts to complete setup.
If you configured Windows to use a Microsoft account, you’ll need to do one last tweak before you can sign on in an enhanced session and use your VM in full-screen mode: Go to Settings > Accounts > Sign-in Options and turn the Require Windows Hello Sign-in For Microsoft Accounts switch to the Off position.
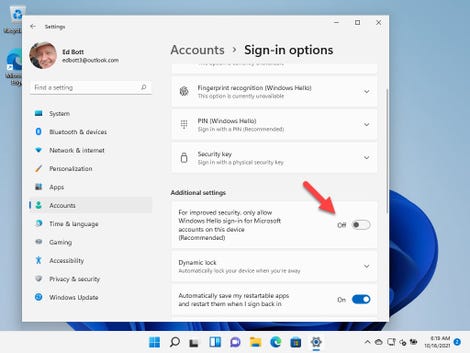
You’ll need to turn this setting off to sign in to a Windows 11 VM using a Microsoft account in an enhanced session
If you forget to make this adjustment and try to sign in using an enhanced session, you’ll find yourself stuck at the Windows sign-in screen with only the background image visible. The fix is simple: From the Virtual Machine Connection window, choose View, then click Enhanced Session to clear the checkbox and switch to a basic session.
Sign in and make the change to your account settings and then use the View menu to switch back to an enhanced session.
Stay connected with us on social media platform for instant update click here to join our Twitter, & Facebook
We are now on Telegram. Click here to join our channel (@TechiUpdate) and stay updated with the latest Technology headlines.
For all the latest Technology News Click Here
For the latest news and updates, follow us on Google News.
Denial of responsibility! NewsAzi is an automatic aggregator around the global media. All the content are available free on Internet. We have just arranged it in one platform for educational purpose only. In each content, the hyperlink to the primary source is specified. All trademarks belong to their rightful owners, all materials to their authors. If you are the owner of the content and do not want us to publish your materials on our website, please contact us by email – [email protected]. The content will be deleted within 24 hours.