Canonical has made it easy for admins to join Ubuntu Desktop to Active Directory domains. Jack Wallen walks you through the steps.

Image: iStock/LeoWolfert
Ubuntu 21.04 was made available last month and it has been quite the hit with both end users and businesses. Although you won’t find a massive amount of new features, what is there should be considered a significant step forward for enterprise and other business use cases.
One particular feature that network and security admins will greatly appreciate is the ability to easily connect Ubuntu Desktop to an Active Directory domain. With this newly added ability, Linux desktops have become a more viable option for companies. The added benefit of this is users will be working on a more reliable and secure platform.
How do you join a new instance of Ubuntu Desktop to an Active Directory domain? I’m going to show you.
SEE: Security incident response policy (TechRepublic Premium)
What you’ll need
To make this work, you need to do a fresh install of Ubuntu Desktop, because it is during the installation the connection to Active Directory is made. So download an ISO of Ubuntu Desktop 21.04, burn it to a USB or create a new virtual machine, and prepare to connect.
How to connect Ubuntu to the Domain
During the installation of Ubuntu, you’ll get to the user creation screen. On that screen, go ahead and fill out the user information as you would normally do, but make sure to click the checkbox for Use Active Directory (Figure A).
Figure A
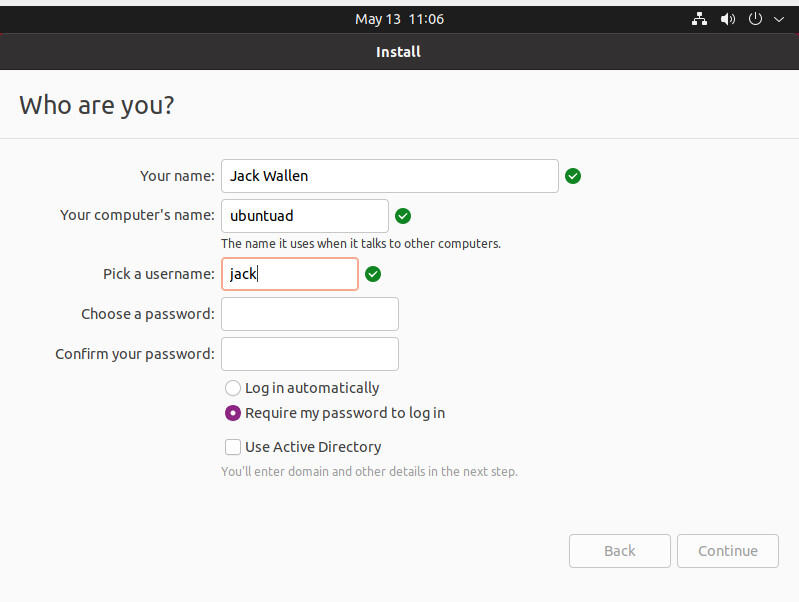
Enabling the Active Directory connection during the installation of Ubuntu Desktop 21.04.
Click Continue.
In the next screen, fill out the domain and then click Test Connection (Figure B).
Figure B

Configuring Active Directory from the Ubuntu Desktop 21.04 installer.
You should get a green check when the connection tests out. Once you see that, fill out the Domain Administrator and enter the password for that admin. With that information complete, click Continue and the installation will complete. Restart the machine and log in.
Once you’ve logged in, open a terminal and issue the command:
realm discover REALM
Where REALM is the name of the realm you’ve joined. You should see in the output, the details for the realm (Figure C).
Figure C
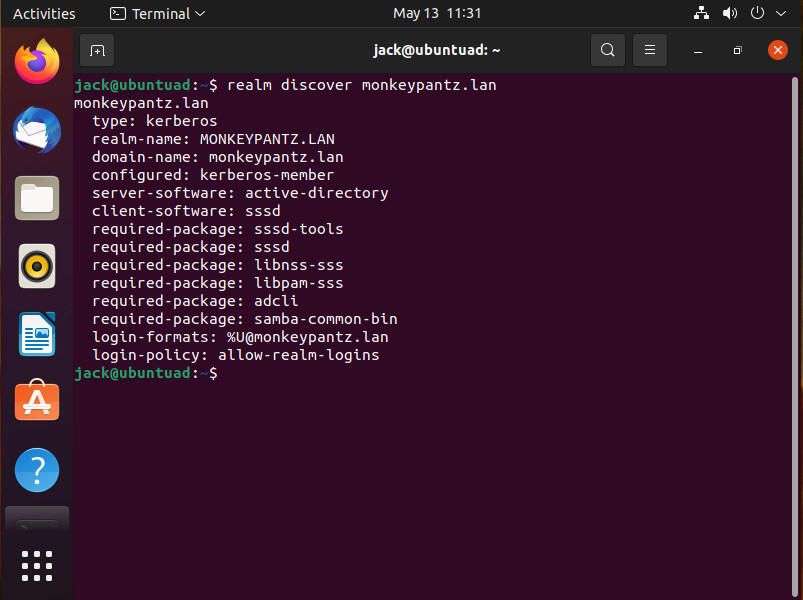
I’ve joined a new instance of Ubuntu Desktop to the MONKEYPANTZ.LAN realm.
Now that the Ubuntu Desktop machine has successfully joined the domain, you can then log in with users (who are a member of the domain) at the desktop login screen in the form of USER@REALM, where USER is the user with an Active Directory account and REALM is the realm the computer has joined.
Congratulations, you can now deploy Linux as a viable desktop solution on your company network. You can now more easily control the users that can log in to those desktops, with strict company policies.
Subscribe to TechRepublic’s How To Make Tech Work on YouTube for all the latest tech advice for business pros from Jack Wallen.

Cybersecurity Insider Newsletter
Strengthen your organization’s IT security defenses by keeping abreast of the latest cybersecurity news, solutions, and best practices.
Delivered Tuesdays and Thursdays
Sign up today
Also see
Stay connected with us on social media platform for instant update click here to join our Twitter, & Facebook
We are now on Telegram. Click here to join our channel (@TechiUpdate) and stay updated with the latest Technology headlines.
For all the latest Technology News Click Here
For the latest news and updates, follow us on Google News.
Denial of responsibility! NewsAzi is an automatic aggregator around the global media. All the content are available free on Internet. We have just arranged it in one platform for educational purpose only. In each content, the hyperlink to the primary source is specified. All trademarks belong to their rightful owners, all materials to their authors. If you are the owner of the content and do not want us to publish your materials on our website, please contact us by email – [email protected]. The content will be deleted within 24 hours.